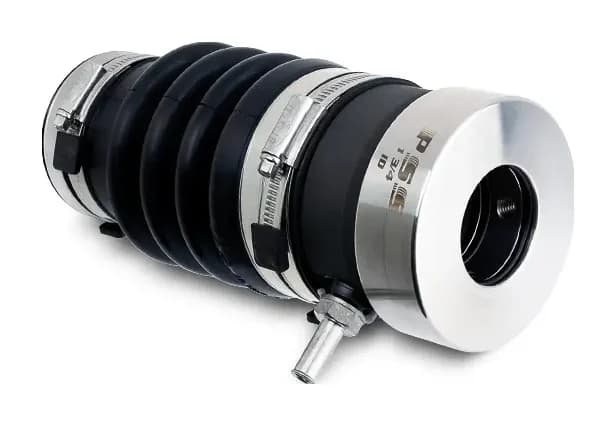
Installing a PSS shaft seal
Retrofitting a PSS in place of a stuffing box is a well-trodden path — the shaft stays in the boat, the coupling comes off, and the whole job is usually done within a haul-out morning. Here's what's involved, including the two rules people miss: bellow compression and the water supply.
The retrofit, step by step
- 1
Haul out and uncouple
With the boat out of the water, unbolt the shaft coupling from the gearbox and remove the coupling from the shaft.
- 2
Strip the old gland
Remove the stuffing box and all packing. Clean the exposed shaft with 400–600 grit paper and deburr the keyway — sharp edges destroy O-rings on the way past.
- 3
Fit the bellow
Slide the bellow (with its two clamps loose) onto the stern tube so it overlaps by the full cuff length — no more, no less. The tube's leading edge must not push into the bellow's inner ribs.
- 4
Fit carbon and rotor
The carbon stator fits the bellow's forward end. Check the rotor's two internal O-rings, apply thread-locker to the set screws (stopping short of the bore), and slide the rotor on using dish soap and water only.
- 5
Re-couple and centre
Refit the coupling, confirm the carbon is centred (it's deliberately over-bored to float) and that the shaft runs near-centred and parallel through the log. Tighten all four hose clamps.
- 6
Compress and lock
Slide the rotor to just touch the carbon, mark the shaft, then compress the bellow per the chart below. Torque the set screws, then add the second locking screw in each hole with thread-locker.
- 7
Plumb it
Connect the vent line or water injection (rules below) — then burp the seal at launch and check for the normal fine mist during the one-hour break-in.
Bellow compression
3/4"–1-3/8" (20–35 mm): 3/4" (20 mm)
1-1/2"–3-3/4" (38–95 mm): 1" (25 mm)
Set screw torque
3/4"–1-3/8": ≈ 6 ft-lb (8 Nm)
1-1/2"–3-3/4": ≈ 8 ft-lb (11 Nm)
The rule installers miss: vent or water injection
The seal faces are water-lubricated — lose the water and the seal squeals, overheats and wears. Every standard PSS should be plumbed one of two ways, and boat speed decides which.
Under 12 knots: vent line
- 3/8" (8–9 mm) ID underwater-rated hose on the carbon's barb, double-clamped
- Run at least 610 mm (2 ft) above the waterline, near the centreline so heeling never submerges the top
- No loop at the top, and never plug the end — it must breathe
- Keeps air from being trapped at the seal faces after launching
Over 12 knots: water injection
- Above ~12 knots the stern tube develops a vacuum that pulls cooling water away from the faces — positive feed is mandatory
- Tee off the engine's raw-water circuit (PSS T-kits suit 3/4"–1-1/2" hose) at no more than 10 PSI
- Also required at any speed if there's a bearing in the shaft log, or if the stern tube can leave the water
- Twin engines that exceed 12 knots on one engine need a crossover line between the two seals
Loss of cooling water is the number-one cause of face seal problems. If you hear a high-pitched squeal, the faces are running dry — ease off and check the vent or feed line. We stock PSS vent fittings, T-kits and hose to plumb it properly.
What you'll need
- The right seal — two measurements pick it: shaft Ø and stern tube OD (use the size finder)
- Enough exposed stern tube for the bellow cuff: 38–64 mm depending on size
- Vent fitting or water-injection T-kit and underwater-rated hose
- 400–600 grit paper, dish soap, and the supplied thread-locker and clamps
- A spare maintenance kit aboard is cheap insurance — bellow, O-rings, screws and clamps
Not a DIY person? Any competent shipwright or marine mechanic can fit a PSS in a haul-out morning — we can recommend installers and will supply the seal, plumbing and spares as one package.
Installation FAQs
Can I install a PSS seal with the boat in the water?
No. The official instructions are explicit: the boat must be out of the water for installation, and the shaft coupling must come off so the old gland and the new seal can slide over the shaft. The shaft itself usually stays in place. Plan it with a haul-out — most installs take an experienced fitter only an hour or two.
How much do I compress the bellow?
Slide the rotor along the shaft until it just touches the carbon face, mark the spot, then push it further to compress the bellow: 3/4" (20 mm) of compression for 3/4"–1-3/8" (20–35 mm) shafts, 1" (25 mm) for 1-1/2"–3-3/4" (38–95 mm) shafts. These are PSS's averages — if the seal mists after its one-hour break-in, add compression in 1/4" increments.
What lubricant can I use on the O-rings when sliding the rotor?
Dish soap and water only. Never use oil, grease, petroleum products or silicone — they attack the nitrile O-rings and bellow. The same rule applies for the life of the seal: keep fuels, oils and harsh chemicals away from the bellow, including during engine winterising.
Why two set screws per hole?
The rotor takes the full bellow load, so PSS uses two cup-point set screws stacked in each of the two holes. The first screw is fitted with thread-locker and torqued — about 6 ft-lb on shafts to 1-3/8", 8 ft-lb above — then the second goes in on top as a locking device. Cup-point screws bite once: never reuse them, which is why every maintenance kit includes a fresh set.
Planning an install?
Tell us your shaft size, stern tube OD and boat speed — we'll supply the right seal with the correct vent or injection fittings, usually from stock.
Luxfords is an authorised PSS dealer holding one of Australia's largest ranges in stock — most shaft and stern tube combinations are on the shelf, so we can usually have you sorted straight away.
(03) 5973 6444